Honkai: Star Rail Guide to Treasure Chests and Spirithief Locations in Sanction of Prophecy’s Janusopolis
Honkai: Star Rail has just introduced an exciting update, unveiling the expansive area known as the “Sanctum of Prophecy”located in Janusopolis. This new site is significant to Tribbie’s narrative as part of the latest Trailblaze Mission, featuring an array of expansive 3D environments ripe for exploration. Players can anticipate the thrill of discovery with the multitude of treasure chests and the premium currency, Stellar Jades, awaiting them.
Adventurers can expect to find a total of 59 treasure chests, which include challenges presented by Prophecy Tablets, the Golden Scapegoat, and Spirithief. This guide is designed to pinpoint each treasure’s location, helping players maximize their rewards. Prior to embarking on this treasure hunt, it is advisable to complete the full Trailblaze Mission titled ‘Light Slips the Gate, Shadow Greets the Throne’ to ensure all gates are accessible while navigating through Honkai: Star Rail.
Treasure Locations in “Sanctum of Prophecy”Janusopolis
The quest for the first 12 treasure chests in the Sanctum of Prophecy Janusopolis begins with an Adventure Mission named Janus’ Maze. To kick off this quest, players must converse with Priest Monnta in the Archive of Prophecies. Completing the Janus’ Maze puzzles unlocks all 9 treasure chests, and in the process, players will interact with three additional NPCs who also offer chests as rewards.
- 13. Utilize the Theophany Altar Space Anchor and navigate south. Employ the Janus’ Hidden Passage to the west to discover a concealed room.
- 14 through 16. Warp to the Archive of Prophecies Space Anchor, and upon arrival, look back for a Prophecy Tablet puzzle. Completing this puzzle unlocks a barrier in the center of the room, granting access to the next two treasure chests as well as a Golden Scapegoat puzzle.
- 17. Exit that room and descend the stairs heading west to find another treasure chest.
- 18. Ascend to the second floor and proceed southeast until you reach the end of the corridor.
- 19. Continue to the third floor and move towards the southwest for yet another Basic Treasure Chest.
- 20. Be prepared! A Spirithief may take the previous chest. Use Oronyx’s power to confront it, earning Stellar Jade and reclaiming the stolen loot.
- 21. Transport back to the Archive of Prophecies Space Anchor and venture into the basement where the next chest awaits behind the spiral staircase.
- 22. Enter the door leading to Tribbie’s room and head to the bedroom for another Basic Treasure.
Navigate to the 3D room using the Hidden Passage of Contemplation Space Anchor. This area boasts three distinct floors incorporating the Evernight and Dawn mechanism.
- 23. Upon entering, ensure the space-time is set to Evernight. Go to the second floor on the left side for a Prophecy Tablet puzzle.
- 24. After solving, turn around and repair the broken bridge using Oronyx’s power to retrieve a treasure chest across the bridge.
- 25. Utilize the repaired bridge to access the lower floor. Use the Miracle Orb to illuminate the stairs and look for a Basic Treasure underneath them.
- 26. Ascend again, switch the space-time to Dawn, and locate a Golden Scapegoat puzzle in the corner near the Tome of Miracles.
- 27. At the same level, navigate to the center of the room at a stone control platform to manipulate the Hand of Zagreus. Collect 3 Coins of Whimsy to unlock a hidden treasure chest. Additionally, use the mechanical hand to destroy a breakable box on the lowest level and obtain a triangle stone to balance on the left scale. Ultimately, position the Hand of Zagreus as a bridge on the third floor before disengaging.
- 28. Head to the left side of the 3D room and utilize the Miracle Orb to illuminate boxes on the lower floor. Then, walk downstairs to the end of the path for a treasure chest. Additionally, deactivate the nearby Miracle Orb for another treasure chest.
- 29. On this same level, proceed to the left side past two enemies to find a treasure chest concealed behind breakable shields.
- 30. Now, traverse to the opposite side of the room and ascend the stairs to the right scale. Activating this scale will elevate you to the third floor where the treasure chest is located just in front of the scale.
- 31. Following the previous step, continue along the path until you reach the first Miracle Orb. Illuminate it to reveal the Janus’ Hidden Passage on the left side, then follow the path for a Golden Short Spear. Break the shield and repair the spear before proceeding to unveil the reward.
- 32. Use the Hand of Zagreus as a bridge across and continue to the end of the path for a treasure chest.
- 33. Access the other side through the Janus’ Hidden Passage and activate the Miracle Orb to reveal it on the right side. Switch the space-time to Evernight and approach the right scale for another treasure chest.
- 34. Finally, employ the illuminated Janus’ Hidden Passage to traverse the other side, entering a small room to claim a Precious Treasure.
- 35. Teleport to Destiny’s Gate Space Anchor to find the next treasure chest located behind the waypoint.
- 36. Proceed west and descend the stairs for a Prophecy Tablet puzzle. Completing this will yield a Bountiful Treasure.
- 37. Visit the south balcony where you can find a Golden Short Spear right on the edge. Repair the spear to unlock rewards.
- 38. Near the previous location, utilize Janus’ Hidden Passage to access a secret area, where a treasure chest awaits on your right.
- 39. A Spirithief may snatch the chest; chase it using the Hand of Zagreus to break through the boxes obstructing your path.
- 40. Collect Coins of Whimsy using the Hand of Zagreus to reveal a hidden chest, and clear breakable boxes in the center for a Golden Scapegoat puzzle, positioning the hand as a bridge nearby.
- 41. Use the Janus’ Hidden Passage from the Spirithief’s last known area to unlock a hidden room and tackle the Formidable Foe challenge to earn a treasure chest.
- 42. Next, teleport to the Worshiper’s Footpath Space Anchor and look westward for another chest.
- 43. From the prior waypoint, take the northwest elevator to reach a lower level, where the next chest is situated directly ahead.
- 44. Nearby, discover a Golden Scapegoat puzzle, the same one uncovered by the Hand of Zagreus earlier; solve it for more rewards.
- 45. Head south, crossing the Hand of Zagreus bridge, to claim a treasure chest on the opposite side.
- 46. From your last position, reverse and repair the broken bridge to cross, then claim the treasure chest below.
In the concluding segment, players will explore the remaining two 3D rooms within the “Sanctum of Prophecy”Janusopolis. Teleport to the Worshiper’s Footpath Space Anchor and proceed into the southbound 3D room. Upon entry, turn right and ascend to the second floor to activate the Miracle Orbs, directing their light to the left bridge.
- 47. Continue navigating the path beyond the Miracle Orb and use the Janus’ Hidden Passage to access the opposite side and locate a treasure chest.
Proceed to the lower floor, cross the illuminated bridge, and reach the center of the room to purify the black tide. After completing that task, once more ascend to control the Miracle Orb and direct its light onto the right bridge.
- 48. Descend and utilize the Tome of Miracles at the front of the chamber to shift the space-time back to Evernight. Retrace your steps down the broken bridge to find a treasure chest behind the pillar.
- 49. Ascend again, repair the bridge to cross it, and claim the Precious Chest nestled at the center of the room.
- 50. Use the illuminated right bridge to locate the final treasure chest within this room.
- 51. Teleport to the Calyx (Golden): Bud of Memories, where a chest awaits near the flower.
- 52. From the Worshiper’s Footpath Space Anchor, move east down the path leading to the last 3D room, with a treasure chest located on the right side before the entrance.
- 53. Upon entering the 3D room, switch the space-time to Evernight, then return to the entrance to discover a Basic Treasure.
- 54. Turn around and cross the bridge to reach the next treasure chest on your left.
- 55. Continue forward to locate a Miracle Orb. Employ it to illuminate an area near the door before adjusting the space-time to Dawn, revealing a treasure chest.
- 56. Use the Miracle Orb once more, redirecting the light towards the statue. Subsequently, interact with the nearby stone control platform to control the Hand of Zagreus and gather 3 Coins of Whimsy to unlock a Bountiful Treasure.
- 57. From this location, turn left to find another treasure chest.
- 58. Use the teleportation feature to reach the End of the Gate Space Anchor, looking left upon arrival to find a Basic Treasure.
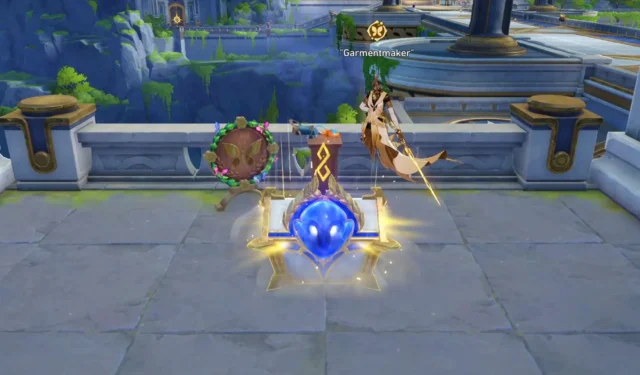
The final treasure chest within the “Sanctum of Prophecy”Janusopolis can only be claimed after players collect all 10 Nymphs in the area and return them to Garmentmaker near the Destiny’s Gate Space Anchor. Once this task is completed, a small Hand of Zagreus will appear adjacent to the Nymph on the platform. Players can then descend using the nearby elevator to control the Hand of Zagreus. There are eight circles located on the wall; players need to guide the mechanical hand through these circles in the specified sequence (3 – 1 – 4 – 1 – 5 – 5 – 2 – 6) to unlock the final treasure chest.
Source & Images
Related Articles:
Top 10 Survival Games Featuring Soulslike Mechanics
14:03July 13, 2025Top 10 Metroidvania Games to Convert You into a Fan
13:05July 13, 2025Comprehensive Reggie Guide: Master the Art of Dating Everything
18:44July 12, 2025Top 10 Iconic Boss Fights From the PS1 Era
15:03July 12, 2025AMD Develops Enhanced “AERITH Plus” SOC Featuring Increased Clock Speeds & LPDDR5x, Likely Targeting Steam Deck 2
Kingdom Come: Deliverance 2 – A Guide to Romancing Rosa
Leave a Reply Cancel reply
Your email address will not be published. Required fields are marked *