Upon entering the expansive world of Oblivion Remastered, many players find themselves exploring the enigmatic Vilverin, an underground cave rich with lore and treasure. Nestled just across from the Imperial Sewers, this extensive Ayleid ruin is not only visually captivating but also teeming with valuable items that can significantly aid your journey—if you’re prepared for the challenges that lie ahead.
Venturing into this subterranean realm, you might overlook some essential gameplay mechanics and hidden paths that can greatly enhance your experience.
Vilverin Walkthrough: A Step-by-Step Guide
Your adventure begins after clearing an adjacent bandit camp and entering Vilverin through its primary entrance. You’ll navigate an eerily lit tunnel where another bandit lurks at the base of the stairs, ready to ambush unwary adventurers.
Once you’ve dealt with this threat, continue your descent carefully, taking note to sidestep the pressure plate that triggers a perilous spiked trap along the curved path. Upon reaching the next stairway down, approach cautiously; a bandit indulging in a meal is blissfully unaware. Utilize the element of surprise to dispatch them swiftly, paving the way for deeper explorations.
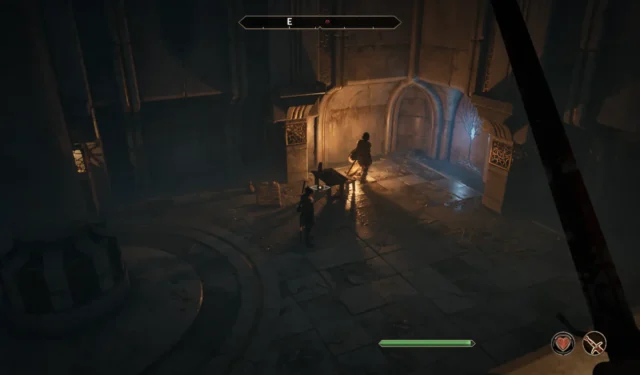
Image credit: Bethesda/VG247The subsequent passage opens into a vast chamber brimming with potential loot: three more bandits inhabit this space alongside various chests. Ascend the illuminated staircase to the south first; here, you’ll discover a bedroom stocked with precious Welkynd Stones and a letter that hints at a bandit’s disappearance within the tomb below.
Image credit: Bethesda/VG247Retracing your steps, head to the stairs leading north this time. Encounter yet another seated bandit overlooking a balcony. Ideally, eliminate them silently for a crucial advantage when tackling the two remaining foes, including their leader, on the opposite side.
Defeating them opens access to the next area, known as Vilverin Canosel.
Exploring Vilverin Canosel
Image credit: Bethesda/VG247Once inside, inspect the nearby Ayleid Cask before proceeding. Turn east to confront a bandit, while the northern section contains additional loot. However, your next key route lies to the west.
Image credit: Bethesda/VG247In the western corner, tread upon the concealed pressure plate to unveil a hidden passage. Here, you’ll locate the bandit mentioned in the earlier letter. A locked gate to the north leads to a skeleton dungeon filled with loot, but be mindful of the flooded corridor you must swim through to progress.
Alternatively, you can find another secret passage that provides a more combat-free route to the same destination. From the deceased bandit’s location, move west to activate another pressure plate that reveals a concealed door.
Image credit: Bethesda/VG247This door leads to a zombie encounter, a foe that can be defeated easily if handled one-on-one. Continue through the passage, eliminate a skeleton, and gather any loot to your left before entering another well-lit chamber.
In this space, you will face two skeletons. After overcoming them, proceed to the westward passage that leads to Vilverin Wendesel.
Inside Vilverin Wendesel
Image credit: Bethesda/VG247Upon entering, descend the nearby stairs into a room adorned with Welkynd Stones. Be wary of the spike traps positioned on the floor, which will spring if you step on them. Carefully navigate the room’s perimeter to avoid unnecessary injury.
Defeat the skeleton located on the opposite side, then ascend the stairs for more loot. Once at the top, take the left passageway.
Image credit: Bethesda/VG247Upon entry, you’ll trigger a locking mechanism that seals the exit. In front of you, six push buttons await your command.Be cautious: do not press them simultaneously. Each will unleash a skeleton and allow access to one of the side rooms, some containing treasure chests.
To maximize experience and loot, activate each button one at a time. After finishing, retrieve a key from a chest located in the back right corner of the room to unlock the hard-locked door. Alternatively, you can also attempt to unlock it yourself for additional Security XP.
Image credit: Bethesda/VG247Next, continue your journey until encountering more skeletons guarding an Ayleid Cage. To access the contents, transit through the chamber, ascend the stairs, and activate the button positioned on the balcony. Afterward, leap down to claim the incredibly valuable Varla Stone.
Continue retracing your steps until you reach the concluding area, known as Vilverin Sel Sancremathi.
Reaching Vilverin Sel Sancremanthi
Image credit: Bethesda/VG247Proceed with caution, sprinting through the retractable blade traps embedded in the walls. Your goal is the Ayleid Statue—another prized item that can be sold to initiate a captivating side quest.
While additional skeletons and treasures are present along the left and right paths, continue going straight (west) to escape.
Image credit: Bethesda/VG247In this final chamber, you’ll face off against the formidable necromancer, Jalbert. Unlike previous adversaries, Jalbert offers a genuine challenge. Employ a mix of stamina and healing—especially when he conjures familiars to assist him. Prioritize your attacks on Jalbert, as defeating him will send his minions back to whence they came.
Image credit: Bethesda/VG247Once victorious, loot his quarters, especially the key in front of the chest, then follow the solitary pathway upward. Unlock the gate with your newfound key and follow the tunnel back to the exit leading back to Vilverin’s main entrance.
Before you embark on new adventures, snatch up one final chest for additional treasures. After this captivating detour, remember to return to your main quest, where you can acquire your first horse to ease your journey. If you’re interested in sub-quests, be sure to check out how to join the Dark Brotherhood and Thieves Guild.
Source & Images
Related Articles:
Optimal Archer Build and Team Composition for Honkai Star Rail
9:55July 12, 2025Becoming a PlantSim in The Sims 4: Enchanted by Nature Guide
16:28July 11, 2025Sony reveals Ghost of Yōtei PS5 bundles with inspiration from Japanese art
4:05July 11, 2025ZZZ Ju Fufu Build Strategies and Optimal Team Compositions
2:33July 11, 2025TSMC SoW-X Packaging Technology to Enter Mass Production by 2027; Promises 40x More Computing Power than Existing CoWoS Solutions
Upcoming Windows 11 Version 25H2 Release and Possible Build Number
Leave a Reply Cancel reply
Your email address will not be published. Required fields are marked *