Clair Obscur Expedition 33: Strategies to Defeat Golgra
In the realm of JRPGs, I often find an unexpected thrill in exploring zones or challenging formidable bosses that outstrip my current party’s capabilities during the main narrative arc. This design choice cleverly provides an opportunity for backtracking while rewarding skilled players with the chance to tackle difficult content earlier than intended.
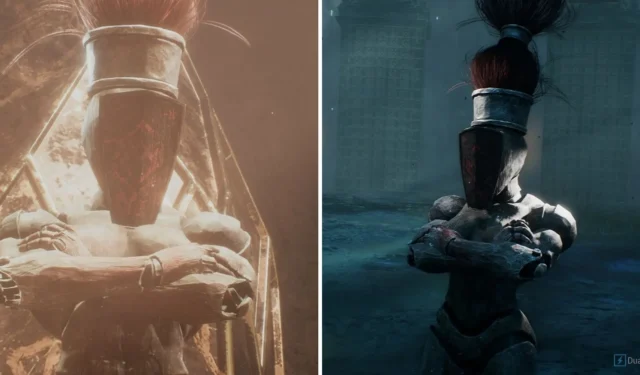
One of these intriguing encounters is the secret boss fight against Golgra, the chieftain of the Gestral. This confrontation becomes available at the onset of Clair Obscur: Expedition 33. However, her formidable difficulty often leads many fans to regard her as an endgame adversary.
This comprehensive guide will equip players with strategic insights for overcoming Golgra in Clair Obscur: Expedition 33, alongside tips on which Pictos and abilities best suit each character. We’ll focus specifically on her optional encounter in Gestral Village, recognized as the most challenging of the three instances in which players face her.
Preparing for Golgra
What distinguishes Golgra from other endgame bosses in Clair Obscur: Expedition 33 is that each character engages her in a one-on-one duel. Consequently, it’s vital to consider both the individual levels of each party member and the resources invested in their growth. This may not pose a challenge for avid players, but those who haven’t diligently pursued skills with Monoco throughout their journey may find the fight daunting.
While each character features unique mechanics and abilities, the preparation method for tackling Golgra remains fairly uniform. Numerous Pictos exist that enhance solo combat effectiveness, and we will be optimizing our approach around these crucial elements.
Best Pictos Against Golgra
This guide deviates from traditional boss fights as we are not operating as a collective but as individual characters. Therefore, it’s essential to highlight which Pictos are most effective for solo encounters, detailing their advantages and acquisition locations.
Five crucial Pictos should be prioritized and their Luminas mastered to facilitate a smoother battle with Golgra. Fortuitously, all of them can be discovered within the Hidden Gestral Arena, which additionally serves as a practice ground for duel scenarios.
Access to the Hidden Gestral Arena is granted immediately after departing from the Flying Waters. Referring to the World Map, proceed westward, bypassing Abbest Cave, and upon nearing some distinctive yellow-green foliage, you’ll uncover the arena’s entrance.
Within this arena, five adversaries await, each presenting a progressively tougher challenge. Triumphing over each grants access to Pictos enhancing solo combat, which should be equipped upon acquisition.
I paint
Effect
Deal 50% more damage if fighting alone.
Gain Rush if fighting alone.
Gain Powerful if fighting alone.
100% Critical Chance while fighting alone.
Gain Shell if fighting alone.
As evidenced, all of these Pictos’ effects enhance solo combat capabilities. The benefits include increased damage output, enhanced speed, improved durability, and guaranteed critical hits, considerably bolstering your chances of success. Regardless, defeating her at the early stages of the game will still require significant skill, young Padawan.
My recommendation is to engage Golgra during the endgame, specifically in Act 3, banking on Pictos like Painted Power. Defeating bosses such as Sprong will yield An Image, noted as the game’s finest, while also taking on Serpenphare can grant additional advantages.
These two Pictos will confer a notable advantage against Golgra, enabling multiple attacks per turn or the opportunity to heal while preserving AP reserves. Additionally, keep in mind the corresponding Lumina, which should have been in use since the end of Act 2.
Optimal Skills for the Encounter
In this section, I will outline the skills I predominantly relied upon for each character, rationalizing why they stand out as optimal choices and my strategies for securing victories. Truth be told, my focus was solely on maximizing damage output.
In situations where the fight was tilting against me, I opted for a Health Tint to restore my health or an Energy Tint to recover AP, finding their benefits far exceed that of standard attacks.
Character Breakdown: Verso
Skill
Description
After 1 turn, deals extreme single-target Physical damage.13 hits. Interrupted if any damage taken. S Rank: Increased damage.
Deals very high single-target Light damage.1 hit. Can Break. Rank S on Break. B Rank: Costs 5 AP.
There’s little mystery surrounding Verso’s approach. With the Cheater skill, you can rapidly set up the Steeled Strike and unleash it in the subsequent turn, inflicting considerable damage. If Golgra’s Break Damage escalates, employ a Perfect Break to stun her and elevate your perfection rank to S.
This straightforward strategy allowed me to defeat her in a single turn without her even entering Rage mode. However, in cases where that ultimate move doesn’t succeed, the Perfect Break can serve as a necessary comeback. Not only does it produce tremendous damage, but it also grants you an extra turn while she’s stunned, further securing your victory.
Character Analysis: Maelle
Skill
Description
Reduces self-Health to 1 but refills all AP. Switches to Virtuose Stance.
Change Stance: Stanceless. Deals extreme single-target Void damage.1 hit. Removes self-Shields and applies Defenseless.
My tried-and-true strategy with Maelle mirrors those I’ve employed against other formidable foes, including Simon, the top superboss within Clair Obscur: Expedition 33. The essence of my approach involves casting Last Chance first, followed by Stendahl.
Despite Stendahl being slightly nerfed in a patch, it retains its formidable power. Using this combination, I managed to dispatch Golgra with a single hit. Nevertheless, you may need to execute the combo twice in some cases.
Character Overview: Lune
Skill
Description
Deals low single-target damage using Ice, Fire, Lightning, and Earth.4 hits. Critical Hits generate the corresponding Stain.
Deals extreme damage to all enemies.8 hits. Each hit deals damage in a random element. Can only be cast with Fire, Ice, Lightning, and Earth Stains.
Consumes all stains to deal high elemental damage to the target. Can Break if 4 Stains are consumed.
I mistakenly relegated Lune’s role to party support for an extended period.A combination of Elemental Trick and Elemental Genesis stands out as one of the game’s most potent offensive capabilities.
To optimize this combination, you’ll need to construct Lune with a focus on Critical damage. Remember, this solo battle gives you a 100% crit rate thanks to Last Stand Critical, meaning all hits will connect critically. Execute Elemental Trick to generate four stains—one for each primary element.
Afterward, unleash Elemental Genesis, which requires one of each elemental stain. Equipping Lune with Mayhem will also assist in breaking Golgra during crucial moments.
Strategy for Sciel
Skill
Description
Deals medium single-target Dark damage.2 hits. Applies Mark to the target. Applies 3 Foretell.
Deals extreme single-target Dark damage.4 hits. During Twilight, extends Twilight duration by 1 turn. Consumes all Foretell to deal additional damage.
Deal extreme single-target Dark damage with a 10 Foretell application.1 hit. Can Break.
Sciel proved to be the most challenging character for me, primarily due to her attacks lacking significant burst damage. To build momentum, she requires fostering Foretell, applying buffs, entering Twilight, and then unleashing her damage potential. Unfortunately, by the time I reached this stage, Golgra often had already punished me severely.
My effective strategy with Sciel involved carefully building Foretell using the Marking Card while simultaneously maximizing my Sun charges. Upon doing this, I unleashed Twilight Dance to deliver damage and enter Twilight mode.
While in Twilight mode, continue deploying Marking Card to accumulate up to 20 Foretell on Golgra, then repeat Twilight Dance to refresh the duration and expend the accumulated Foretell for significant damage output. Don’t forget to bring Final Path as a backup plan for breaking Golgra or if you find yourself with an excess of AP.
Tactics for Monoco
Skill
Description
Deals low single-target Dark damage.1 hit. Can Break. Agile Mask: fills 20% of the target’s Break Bar.
Deals high Ice damage to all enemies.3 hits. Applies Slow to targets for 3 turns. Balanced Mask: Increased damage.
Deals extreme Void damage to random targets.3 hits. More damage if the same target is hit multiple times. Caster Mask: Increased damage.
Deals extreme single-target Physical damage.4 hits. Can Break. Almighty Mask: Increased damage.
Monoco encounters Golgra in two distinct situations within Gestral Village. In one, if you select him as the party leader and challenge her, the fight is decidedly easier but offers limited rewards. For more significant stakes, provoke her into a duel with Monoco as the challenger, intensifying the encounter.
It’s crucial to note that Monoco’s effectiveness can vary greatly based on preparation. Individuals who haven’t invested significant effort into hunting for his skills may find the battle more challenging. I will outline my preferred build, but be aware it remains a tough fight, regardless.
For my Monoco strategy, I relied on skills like Ramasseur Bonk and Chevalière Ice to simultaneously break Golgra and debilitate her. When she was slowed, I achieved up to four attacks before she could retaliate. The strategy revolves around capitalizing on Monoco’s passives once Golgra is broken.
With the weapon Urnaro, Monoco activates Almighty Mask immediately upon breaking an opponent. This enables proficient use of high-damage skills like Duallist Storm freely. Furthermore, the level 20 effect of Urnaro amplifies Break damage by 50%, enhancing your strategy substantially.
Prioritize skills that propel the Bestial Wheel toward Almighty Mask, supplementing Monoco’s AP through Tints or skill use, and unleash skills that take advantage of this mask advantage. Success will come from patience, skill, and some luck.
Golgra’s Attack Patterns Explained
Like the other formidable Gestral foes, Golgra relies on hand-to-hand combat to dominate her opponents. However, with the right strategies drawn from this guide, you can overcome her might.
Mastering her attack timing might require several attempts.Her patterns can be unpredictable, and animations may mislead you into thinking one attack is being launched when it’s not.
In common fashion with many endgame bosses, upon sufficient damage taken, Golgra enters a second phase, enhancing her combos with additional hits and increasing their speed, which could catch even the most experienced players unprepared.
First Phase Overview
During the initial phase, Golgra unleashes a barrage of rapid combos, incorporating a Gradient Attack with a tight opportunity for a counter. Learning her move set relatively quickly will facilitate your survival.
Concentrate on the phrase indicators rather than visual animations, as many of her moves may appear similar and can throw you off your guard. Understanding what to anticipate will ease countering her attacks.
I encourage the use of parrying; in addition to providing 1 AP per hit, a successful counter inflicts substantial damage on Golgra. However, start with dodges until you sufficiently grasp the timing for her various strikes, then transition to parrying when comfortable.
Attack Phrase Indicator
Attack Description
Recommended Action
“Golgra is dancing around.”
Golgra performs a rapid Gradient Attack with a flipping kick.
Implement Gradient Counter.
“Golgra performs a fast combo.”
A swift 3-hit kick sequence, easy to avoid. Similar in appearance to an impressive combo, so remain vigilant.
Dodge or parry at your discretion.
“Golgra performs an impressive combo.”
A 4-hit kick combo featuring two aerial kicks, culminating in a roundhouse.
Dodge or parry as needed.
“Golgra attacks swiftly.”
The slowest move in her arsenal; a 3-hit combo characterized by an air kick, followed by a somersault and dive.
Dodge or parry to avoid.
These are all of the attacks you’ll encounter during the first phase.Once Golgra’s HP depletes to 50%, she will become enraged, losing her ponytail in a burst of spiky hair while igniting her wooden body.
Second Phase Dynamics
In the second phase, Golgra continues utilizing her signature attacks but enhances them with more hits, elevating her damage output and potential speed, which could grant her additional turns.
Reserve parrying for situations when you need to build AP, as her multi-hit strikes low the likelihood of scoring counters effectively, making it a risk not worth taking.Attack Phrase Indicator
Attack Description
Recommended Action
“Golgra performs a long combo.”
A 6-hit sequence featuring the first four attacks from the initial combo, concluding with two flashy kicks.
Dodge or parry effectively.
“Golgra performs another long combo.”
A 4-hit combo starting with the rapid pattern, concluding with a roundhouse.
Dodge or parry as you see fit.
“Golgra performs a chaotic combo.”
A frustrating 6-hit attack comprised of unpredictable kicks that can confuse players.
Spam the dodge button to evade.
“Golgra shakes the earth.”
After jumping, perform a Gradient Attack, which is more straightforward to dodge.
Jump and execute a Gradient Counter.
Strategies for Defeating Golgra
Ultimately, the primary hurdle when confronting Golgra involves mastering the timing of her erratic sequences. I understand that this may seem self-evident, yet the complexity of dodging her attacks endures even with careful memorization of her combos.
For this reason, my recommendations center on maximizing offense. As Wolverine aptly puts it, the best defense is a powerful offense, as defeating Golgra will prevent her from executing her dangerous combos.
As previously mentioned in the Best Skills section, your sole objective should be to inflict damage with speed and ferocity. There’s no extensive strategy at play; in a solo confrontation, survival is the key.
Be sure to equip all the Solo Pictos and, if available, consider endgame options such as Cheater and Energy Master. It may even be conceivable to build a damage-heavy construct capable of defeating Golgra before she has a chance to retaliate, as witnessed in my encounters with both Maelle and Verso during their fights.
If dodging her strikes poses a challenge, consider Pictos like Base Shield for additional defense or even In Media Res. Each one of Golgra’s assaults could result in a one-hit KO for your characters, which renders the Lumina’s max health reduction negligible.
With a strategy, skillful execution, and a dash of luck, you will soon triumph over Golgra and claim the throne of the Gestral emperor. Don’t forget to accessorize effectively with a stylish haircut and your Sakapatate outfit.
Rewards for Victory
Each conquest against Golgra awards experience points (with significantly higher returns before the day one patch), occasional Recoats, and a steady supply of crafting materials. Furthermore, every character who emerges victorious in the duel will either receive a new weapon or upgrade an existing one.
- 364, 500 XP (Previously 2, 430, 000 before Day One Patch)
- 23, 880 Battle Loot
- if Verso claims victory
- if Lune prevails
- if Maelle triumphs
- if Sciel is victorious
- if Monoco wins
- (not guaranteed)
- x3
Prior to the day one patch, I routinely utilized Golgra as a farming target, expediting my character’s leveling to 99 due to her impressive XP rewards. However, following the patch by Sandfall Interactive, those lucrative experience gains have been diminished.
Nevertheless, battling her remains a worthwhile endeavor for acquiring crafting materials and ensuring every party member receives or upgrades a weapon.
Source & Images
Related Articles:
Top 10 Survival Games Featuring Soulslike Mechanics
14:03July 13, 2025Top 10 Metroidvania Games to Convert You into a Fan
13:05July 13, 2025Comprehensive Reggie Guide: Master the Art of Dating Everything
18:44July 12, 2025Top 10 Iconic Boss Fights From the PS1 Era
15:03July 12, 2025Gemini Now Updates You on Recent Changes to Your Google Drive Files
Intel’s Nova Lake Expected to Feature Hybrid GPU Architecture Utilizing Both Xe3 and Xe4 for Integrated Graphics
Leave a Reply Cancel reply
Your email address will not be published. Required fields are marked *