Quick Links
- Green Monster Of The Swamp: Phase One Attacks
- Puppet Devouring Green Monster: Phase Two Attacks
- Strategies For Defeating The Green Monster Of The Swamp
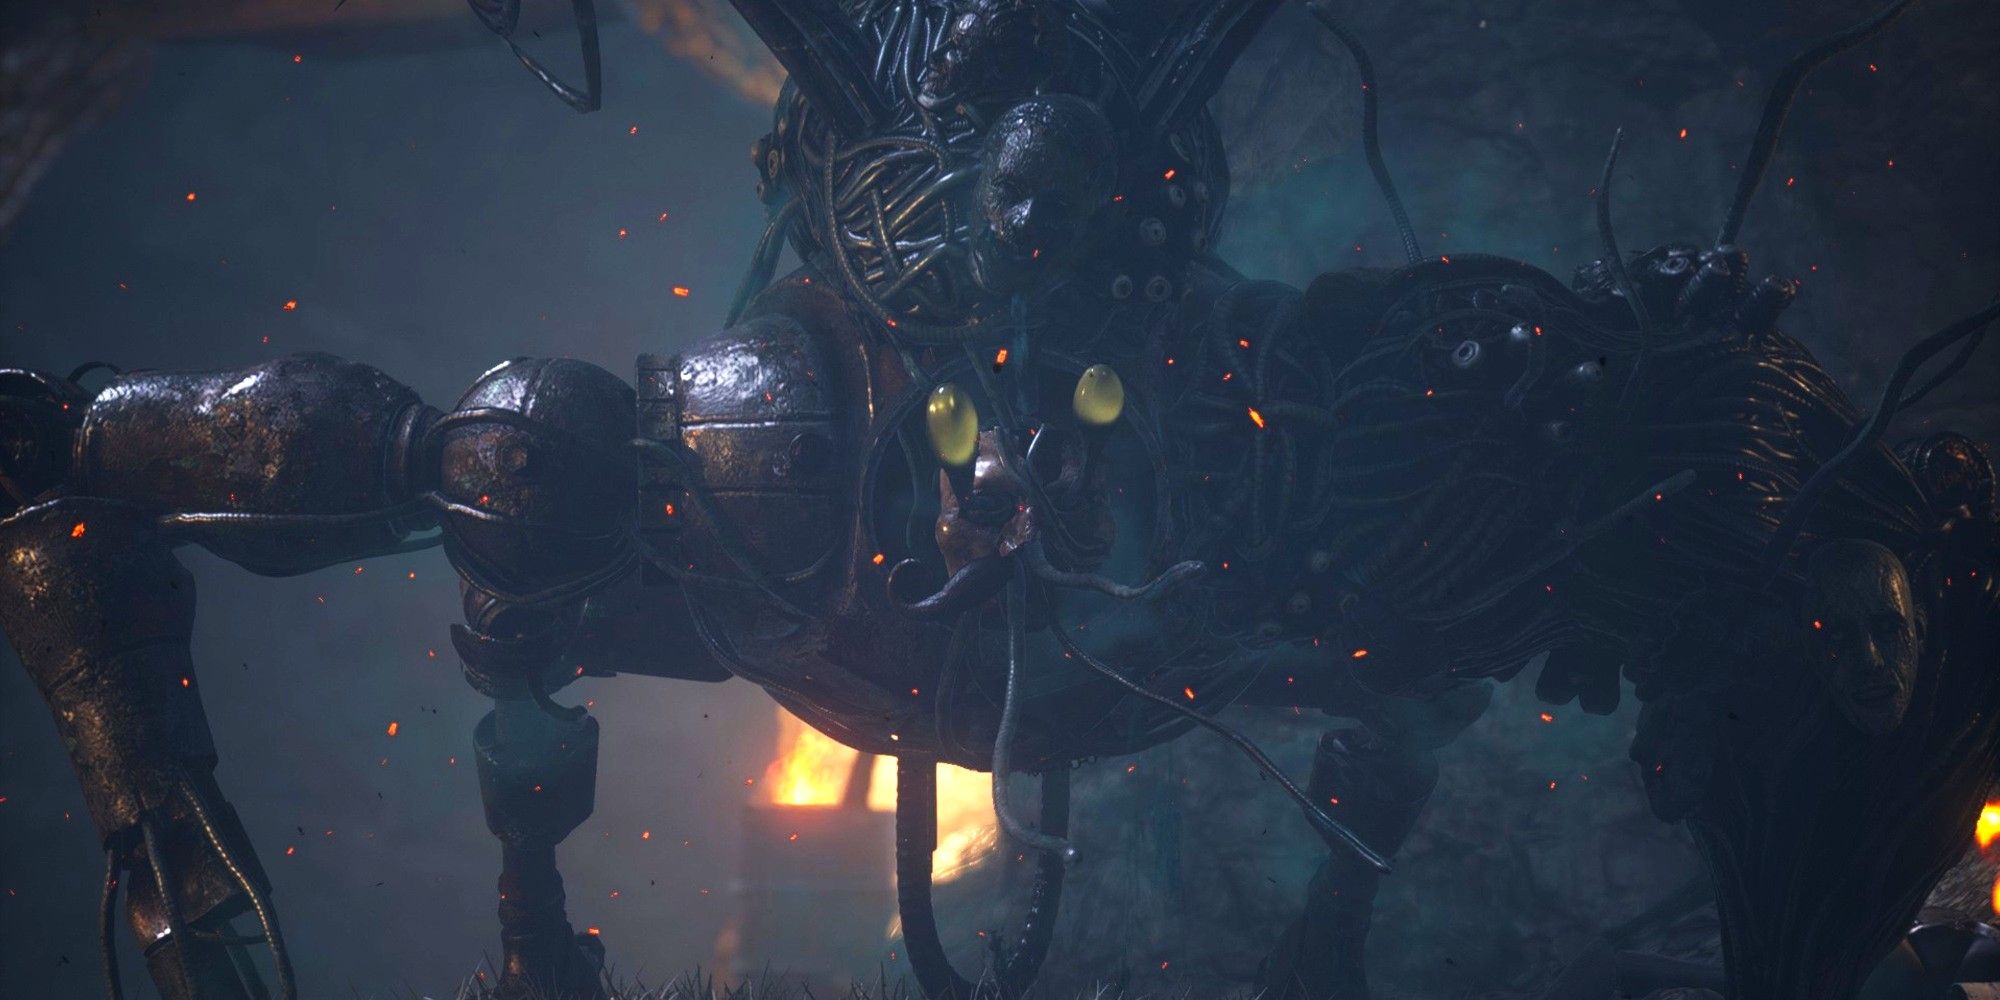
After bashing Champion Victor in Lies of P, the difficult bosses make their return with the Green Monster of the Swamp. Following the long swamp level, you'll be faced with a challenging two-phase boss boasting hard-hitting moves and a huge health pool.
RelatedLies Of P: Barren Swamp Walkthrough
It wouldn't be a Soulslike without a swamp, but Lies of P's Barren Swamp has a few surprises.
PostsThankfully, you'll have gained a number of useful items in the swamp to make this fight a little easier. Additionally, once you know its moves, this fight will turn from a tedious slog to a skillful dance. With fire in one hand and this detailed guide, you'll be slaying your monster in good time.
Green Monster Of The Swamp: Phase One Attacks
Possible Combo Chain
Attack
Wind-Ups And Attack Description
Suggested Counters
Smack Down
One-Two Smack Down
The green monster rears onto its back legs and holds up its right arm above its head. There is a slight delay before it brings its open hand down. If the player is not in front of it, it will lunge forward with this attack in an attempt to close distance.
Dodge the first two normal attacks in any direction. Beware of the delay.
Left Smack Down (Fury)
This move appears like the usual smack down attack with the left hand. However, it is marked as a Fury attack with a red flash. It does have a longer execution than a normal Smack Down. It can appear in this combo as a third move, replace the second handed attack, or can appear in a combo with the tentacle grab.
Perfect Guard this and retaliate with a strike of your own.
Grabbed Smack Down
Tentacle Grab
Rearing up with its weight on its left leg, the monster will pull its right shoulder back as the tentacle on its right side shoots forward over a long distance. It grabs the player for light damage and pulls them into melee range. This is often followed up with the Left Smack Down (Fury).
Dodge in any direction except forward or sprint away.
Hammer Smack Down
Backhand Swipe
This combo is always preceded by a roar from the monster, rearing onto its back legs and holding its fists near its head in frustration. It then rotates its torso to its right before unleashing a massively ranged backhanded swing with its left arm.
Dodge forward.
Smack Down
The monster quickly slams its left hand down in front of it.
Dodge forward and right toward the monster's right leg. Run behind it.
Double Hammer
Pulling its hands over its head, it holds the hands together and swings them down in front of itself in a massive hammering attack.
Stay behind the monster and prepare a strong attack.
Right Swipe
The monster pulls its right hand back and then lunges forward over a small distance with a swipe.
Attack while standing behind it during this move.
Cross-Tentacles
Cross-Tentacles
This attack occurs twice in a back-to-back combo. The beast will begin sidestepping, facing the player as it launches its tentacles forward in two strikes that crisscross in an X-shape.
As soon as you see the beast sidestepping, sprint away and maintain distance.
Retreating Lashes
Retreating Tentacle Whip
The monster crouches and shakes its head furiously before it begins to strike at the area in front of it rapidly with its tentacles. As it attacks, it slowly backs away from its target. This attack deals Decay.
When you see the head shake, sprint away and maintain distance. Do not attempt to attack when it finishes.
Tongue Lash
This is an extremely rare move with a very sudden windup. Its tell is only a slight bracing of the hands and the opening of the monster's mouth just before a long tongue lashes out to strike in a straight line in front of the monster. This damage deals half a meter of Decay. Sometimes, and even more rarely, appears on its own.
Although the full combo only rarely happens, it appears to be triggered by being overly aggressive and charging in after the Retreating Swipe attack. It's best not to attack after the preceding move and wait for better openings, avoiding this attack altogether.
Non-Combo Moves
Retreating Swipe
Turning its body away from the player to the monster's right side, it swipes in front of it with the back of its right hand in a wide arc before leaping back
Dodge backward or guard.
Burrowing Attack
Frantically digging at the ground, the green monster will disappear as it tunnels underground. Your lock-on will be disabled. It will then target the player, burrowing toward you; this is indicated by a disturbed, raised mound on the ground's surface. As it nears the player, it will burst upward from the ground to deal massive damage. It only appears first as its tentacles. Crawling out of the ground after will take a large amount of time.
This attack cannot be blocked, and dodging can be difficult. When the monster begins digging underground, unlock from it and then sprint away to the farthest area of the map. In emergencies or in awkward areas, hold guard in the direction of the beast.
Vomit Decay
The monster roars, both hands on the ground and head lifted. It then begins spewing Decay from its mouth in an arc that slowly follows the direction of the player.
Sprint to the left or right with the goal of reaching the monster's side. When it stops spewing, attack.
Rage Charge (Fury)
Pausing mid-step, the monster will stop moving and flash red before charging straight ahead at the player.
Perfect Guard at the last possible second.
read moreThe Green Monster's moves are thankfully limited in their combos and boast a number of Fury attacks with long wind-ups you can punish. Once you know how to avoid its moves, the first phase will feel like a cakewalk.
Most assuredly, the best moves to punish in the monster's repertoire are:
- Hammer Smack Down combo
- Burrowing Attack
- Vomit Decay
- Both Fury attacks
The Hammer Smack Down is typically the most consistent opening once you get used to dodging through its attacks.
You'll have to dodge twice, each one second apart, for its first two attacks. Do so on its right side, aiming to get behind its right foot. This will set you up for charging a powerful strong attack, even on the slowest Motivity builds.
The Burrowing Attack becomes easy to dodge once you know the secret: Unlock.
You must disable your Target Lock on the monster as it begins burrowing. Then, turn around and run to the furthest area away from it. It will stop before reaching you, and in the long recovery period, you can get several hits in.
To do this successfully, remember to disable your Auto Lock On in the Menu setting before the fight.
Both the Vomit Decay and Fury attacks will have the opportunity to get one good hit in after they finish.
The Vomit Decay will require you to dash in as soon as it stops spewing to get a hit in.
The Fury Attacks will require you to Perfect Guard them as they land.
In the Rage Charge, the secret to Perfect Guarding this attack is to wait a hair longer than you think you should. The narrow parry window is only just as the head makes contact with you.
Puppet Devouring Green Monster: Phase Two Attacks
Possible Combo Chain
Attack
Wind-Ups And Attack Description
Suggested Counters
Monster Charge
Monster Charge
The monster will stop moving and back up before frantically charging forward. It will repeat this three times.
This move is easily bugged out by the combat field.
This move will require you to keep sprinting in a circle around the monster as it rushes through the field. In the case of strange alignments and field bugs, you may need to dash to one side or the other to avoid being struck.
Roll Out (Fury)
Once the third charge has completed, the beast will roll in a strange arc diagonal from its original position. This is usually a Fury attack but may appear as a normal attack.
You can continue sprinting to avoid being struck or attempt a Perfect Guard. Sprinting has a larger rate of success due to the roll's strange hitbox and field snags.
Jump
Jump (x1-x3)
The monster suddenly jumps into the air and lands with its arms on either of its sides, making the hitbox wider than it is long. It can do this any number of times from once to thrice. The monster can turn to face you after running in a half-circle.
As the monster jumps forward you, sprint and doge forward to end up on its back side. Do not attempt to dodge to either the left or right side.
Jump (Fury)
Sometimes, the second or third Jump in the combo will be a Fury attack. This attack will always end the combo.
The Fury attack can and should be Perfect Guarded. You can follow up with one attack.
Wind-Up
Wound-Up Pummels
The monster will pull its right leg and arm back. The right arm will begin to spin and strike the ground on the third rotation. It will then follow with the same attack with the left hand.
Dodge forward, left, or right with the goal of staying as close to the monster as possible. You can do one quick attack after the second strike and while it prepares the Fury attack so long as you have the stamina to guard.
Double Wind-Up (Fury)
Standing up on its back legs, it will then flash red. The monster will spin both arms wildly and strike on the fifth rotation with both hands.
Perfect Guard this attack and stay facing the monster's torso. Do not move.
Double Tentacle Swipe
With both hands on the ground, the monster will briefly raise and lower its head as the two tentacles on its back sweep out on either side of it like butterfly wings.
Stay facing the torso as you unleash a barrage of attacks.
Swipe Barrage
Powerful Left Swipe
The monster will pull back its left arm a great distance and release a swipe that covers a large frontal area.
Backstep and continue sprinting away.
Backhanded Left Swipe
Following up the first attack, the arm will swipe backward again with a lesser range but with great stagger effect.
Sprint away.
Sparking Left Swipe
Pulling its left arm all the way back, the arm will begin sparking at the shoulder joint. This attack is heavily delayed and covers a great distance, dealing massive damage if it makes contact.
Dodge away from this attack, preferably either back or to the left.
Tentacle Swipe
With its left arm still on the ground and leaning to its left side, the left tentacle on its back will swipe the immediate area on that side. This attack is slightly delayed to make you think the combo has ended.
Hold Guard if you're in the area this strikes and follow up with attacks to recover health.
Non-Combo Moves
Tentacle Barrage
The monster will flip its entire torso around and land heavily on all fours by placing its hands on the ground. It will then begin to wildly lash out with all of its tentacles for three-to-four seconds as it crab-walks in a half-circle around you. This attack deals Decay.
When you see the monster flip over, immediately back away and walk out of the area of effect.
Left Swipe
The monster will bring back its left arm and do a standard swipe in front of it.
Backstep.
Tentacle Grab
The monster will quickly lunge forward after a yell and swipe the area with both tentacles conjoining on one spot. If the player is caught by this attack, they will be grabbed, dealt massive damage, and inflicted with Decay.
Dodge in any direction except forward.
read moreThe monster's second stage has an entirely new moveset. None of the moves from Phase One will carry over into the second phase.
You must learn its moveset entirely from scratch, but it's thankfully a little easier to keep track of its moves. It has less standard moves and several long combos with recovery periods you can exploit.
The most dangerous move in its set is its Monster Charge combo. Although it is simple in itself and could easily be dodged, it becomes dangerous due to arena hazards.
This move has a tendency to bug out on the puppet-mounds inside the arena. It can cause the attack to become wildly delayed or even stuck in one spot. In rare instances, the move can also slightly change trajectory to face the player, throwing off dodges.
There is no counter to this bug beyond being vigilant of its appearance and maintaining a wide distance with the monster at all times during this move via sprinting.
Its Wind-Up attack is the best way to get several good melee hits in. It will require you, however, to keep an eye on its Fury Attack.
Staying as close to its torso as possible during the wind-up's, you'll need to learn your parry window from the first phase. Wait a hair longer than you think you need.
The best opening overall, however, is its Tentacle Barrage attack. Thanks to its clear telegraphing, you will rarely - if ever - be surprised by this move.
You'll have the opportunity to heal, repair your weapon, add buffs, or make ample use of your Legion Arm with little threat to your safety as it crab-walks around you.
Strategies For Defeating The Green Monster Of The Swamp
Health
12,000 (P1); 15,000 (P2)
Weak Against
Fire
Recommended P-Organ Upgrades
Increase Staggerable Window, Increase Pulse Cells, Increase Amulet Slots
Recommended Amulets
Patience Amulet, Recharged Amulet, Extreme Modification Amulet, Nameless One's Amulet
Recommended Weapons
Flamberge (Legion Arm), Puppet Ripper, City Longspear, Seven-Coil Springsword, Trident of the Covenant, Holy Sword of the Ark
Your preparation checklist for this boss should include:
- Turning the Auto Lock On feature off in your settings menu,
- Equipping items Fire items to your belt:
- Thermite
- Fire Canisters
- Fire Abrasives
- Equipping and upgrading the Flamberge Legion Arm.
- Equipping and upgrading weapons with good range or high stagger.
You can choose to equip Attribute Purification Ampoules, but the goal is not to get struck and therefore, by extension, not be inflicted with Decay.
During Phase One, your goal is to preserve as many items and resources as you can until Phase Two. This means you must rely on melee attacks and learning the combos.
Getting your parry window down correctly will be your key to success in both phases, so spend time practicing against the first Phase whenever you see a Fury attack.
This creature is immensely susceptible to gaining stagger - especially among enemies of its size. Critical Hits are a near must in this fight thanks to its large health pool and the downtime between attacks. This is why stronger, staggering weapons with good reach are the best options for this fight.
Do not get greedy with the first Phase. Take your time. Although it has a large healthpool, the best strategy is to wait for your openings and get in a few solid attacks.
Thankfully, the monster's moveset is filled with ample openings. This will help prevent it from gaining its health back too quickly.
When you begin Phase One, the monster will always begin with one of two attacks:
- Burrowing Attack
- Rage Charge (Fury)
To avoid being struck with either, we recommend staying near the door instead of rushing in. The Burrowing Attack cannot quite reach you, and standing still will be the key to perfecting the Perfect Guard window for his rushing Fury attack.
Once the attack has passed, you'll have your opening to get in a few hits. After, sprint into the battlefield proper to prevent being stuck against the door.
Phase Two also typically begins with one of two attacks:
- Monster Charge combo
- Jump
Contrary to the Phase One strategy, you'll want to race into the arena and choose a direction. Left or right - it doesn't matter. This will give you room to sprint around and avoid the monster's charge attack if it's chosen.
In general, Phase Two is where things get tricky. With an entirely new attacking moveset, it's almost as if you'll be facing an entirely different boss (much like the King of Puppets fight).
You're likely suffering from lowered weapon durability at this point and tired. The best thing to do is to continue in melee until you're given an opportunity during themonster's Tentacle Barrage.
When it gets into position and begins crab-walking, you'll have enough time to use your Grindstone - both to repair your weapon and also maybe use your Grindstone's effect.
This move will also be the time you should use Flamberge. Once your weapon is repaired, all instances of this attack should be met with a wave of fire as it can reach the monster without you getting too close.
This technique requires the Wave Flamberge upgrade.
Items can be thrown whenever combos have ended and you're not close enough. However, we recommend waiting until you've passed over half of Phase Two's healthbar.
Fire Canisters are best used in the center of the arena, after you've done Stagger attacks. Otherwise, items like Thermite and Sawblades can be used wherever you have an opening.
Between your Flamberge usage during the boss's crab-walk and capitalizing on your Perfect Guard opportunities, you'll eventually get the best of the Puppet-Devouring Monster. He's no easy fight, and beating him may take several attempts.
But between your efforts and this guide, you're on the fast track to success. From here, it'll be straight back to your old stomping grounds: Krat Central Station.
NEXT: Lies Of P: Alidoro Questline Walkthrough