UPDATE: We have added two interactive maps to this guide that show the locations of all items necessary for a Lightning Milady build in Elden Ring, to help you with finding them.
Mastering the Lightning Milady Build in Elden Ring
If you’re navigating the treacherous realm of the Lands Between as the last remaining gentleman, you’re in for a treat. With the launch of Elden Ring’s Shadow of the Erdtree DLC, the Milady weapon has emerged as a quintessential tool to affirm that chivalry is alive and well.
The Essence of Milady
Milady offers dexterity, reach, and a unique charm that make it a formidable choice in battle. This PvE build, often categorized as a “cheese”strategy, maximizes the efficiency of a fully upgraded Milady in conjunction with the Ash of War: Thunderbolt. This combination not only augments Dexterity scaling but also introduces a potent elemental damage type with an imposing ranged attack.
For players who have previously excelled with a Bleed build using the Rivers of Blood katana, this Milady build offers similar gameplay mechanics—shifting from Arcane to Strength—while prioritizing distance over close-quarters conflict.
The Build’s Advantages
The Lightning Milady build proves advantageous for boss encounters where summoning Spirit Ash is permitted. This strategy allows for a more laid-back approach to battling foes, focusing on learning attack patterns instead of relying on a slim margin for error in dodging.
In my experience, this build is particularly effective against hostile encounters such as Rellana, Twin Moon Knight, and Commander Gaius, whose aggressive attack styles can be daunting.
Additionally, the build is versatile enough to tackle regular mobs. Milady boasts a robust two-handed move set characterized by a powerful sprinting poke (R1) and a swift R2 combo, combined with the elemental advantage of Lightning. With the Ash of War’s capacity for ranged attacks, you become a challenging adversary.
Nevertheless, it’s worth noting that this build isn’t recommended for PvP scenarios or boss fights against solitary humanoid enemies (like the Blackgaol Knight), where they can easily evade the Thunderbolt action.
Item Location Guides
To facilitate your journey in assembling the components for the Lightning Milady build, we’ve integrated two interactive maps below, showcasing item locations across both The Lands Between and the Land of Shadow.
Items Required in The Lands Between:
Items Required in the Land of Shadow:
Stats and Starting Class for the Milady Build
- Starting Class: Samurai
- Recommended Level: 150
- Vigor: 60
- Mind: 22
- Endurance: 22
- Strength: 40
- Dexterity: 60
- Intelligence: 9
- Faith: 8
- Arcane: 8
This configuration is designed for Level 150, aligning with the suggested level for the Shadow of the Erdtree DLC. The 60 Vigor is particularly necessary, given the high damage output of enemies in this new content.
Consider distributing the 10 remaining points to Strength, Faith, or Intelligence if you prefer to integrate some magic or incantation capabilities, but maintaining at least 50 Vigor is highly advisable, especially on your first playthrough.
While the Samurai class is not mandatory, it is a popular choice among players. The soft cap for key stats in Elden Ring is 60, justifying the choice of Dexterity at that benchmark. The allocation of 22 points each into Mind and Endurance balances melee and Ash of War demands for this dual approach.
Ash of War, Talismans, and Armor for the Milady Build
Ash of War: The Thunderbolt Ash of War is crucial for enhancing the performance of this build. To acquire it, head to the Avenue Balcony Site of Grace in Leyndell. Proceed down the stairs adjacent to the Site of Grace, through the door at the bottom, and make a left. You’ll find a Scarab on the ledge below; defeating it rewards you with the Thunderbolt Ash of War. For further clarity, check out the video linked below:
Where to Get Thunderbolt Ash of War
Talismans: The essential talisman for this build is the Two-Headed Turtle Talisman, which significantly enhances your stamina recovery—vital for panic rolling or spamming Ashes of War. Depending on your equipment availability, consider using any obtainable Prosthesis Heirloom, selecting either the Prosthesis-Wearer’s Heirloom from Millicent’s quest or the upgraded Millicent’s Prosthesis at the quest’s conclusion.
Opt for any Dragoncrest Shield (or Greatshield) Talisman that aligns with your progress in the base game. Lastly, you should choose one of the following talismans based on your accessibility: Spelldrake Talisman +3, Crimson Amber Medallion +3, or Cerulean Amber Medallion +3. All of these can be relatively easily acquired throughout various dungeons in the game.
Armor: Personal style plays a crucial role, yet the primary goal should be to enhance your poise while maintaining a medium load. A recommended choice is the Fire Knight Helm, obtainable from the Specimen Storehouse. This piece enhances HP, stamina, and equip load while providing decent defense. With it, you can achieve over 61 Poise at medium load, allowing you to withstand hits from most enemies.
Strategizing with the Milady Build
Keeping most regular enemies at bay is easily accomplished using the Thunderbolt Ash of War—as long as it’s within the FP limits of your strategy. When you sense the opportunity for an attack, initiate with a sprinting, two-handed R1 strike to breach the enemy’s defenses and potentially cancel their move.
If the enemy has higher Poise, or you want to follow through for guaranteed damage, transition into the R2 attack to unleash a rapid, double-swipe combo that can decimate weaker mobs. This rinse-and-repeat approach provides a reliable method of handling all but the toughest foes.
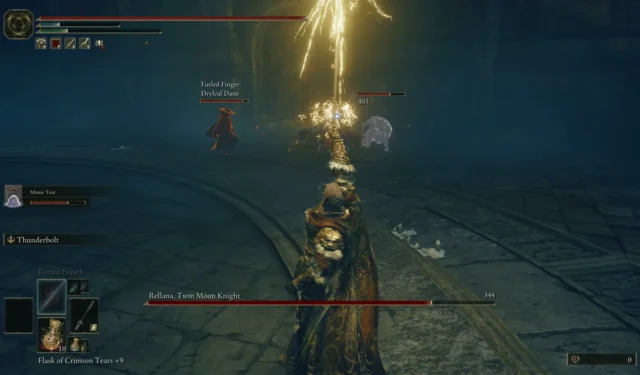
Image credit: FromSoftware/VG247During boss fights, this build’s potential truly shines. As you enter the arena, summon a resilient Spirit Ash, such as the Mimic Tear or Greatshield Soldiers, to absorb the boss’s attention.
Position yourself at the edge of the attack range and continuously use your Ash of War. Its impressive reach allows you to avoid most boss strikes without risk, with little need for extensive dodging.
Remember to top off your FP with Cerulean Tears when necessary; typically, three flasks should suffice. If you notice that the boss is now targeting you due to your damage output, halt your aggression immediately and evade until your summons regain control of the fight.
This strategy is surprisingly effective, prompting speculation about possible nerfs to summons; however, enjoy this advantageous playstyle while it remains relevant!
For further exploration into Elden Ring builds utilizing gear from the DLC, consider checking out our Dryleaf Arts build, Beast Claw build, and Euporia build.
Source & Images
Related Articles:
Optimal Archer Build and Team Composition for Honkai Star Rail
9:55July 12, 2025Becoming a PlantSim in The Sims 4: Enchanted by Nature Guide
16:28July 11, 2025Sony reveals Ghost of Yōtei PS5 bundles with inspiration from Japanese art
4:05July 11, 2025ZZZ Ju Fufu Build Strategies and Optimal Team Compositions
2:33July 11, 2025Top Elden Ring Talismans and Their Locations Uncovered
Ultimate Elden Ring Beast Claw Build for Shadow of the Erdtree
Leave a Reply Cancel reply
Your email address will not be published. Required fields are marked *