Step-by-Step Guide to Create a Villager Breeder in Minecraft 1.21
In Minecraft 1.21, establishing a villager breeder is essential for players looking to amass a large number of villagers efficiently. These villagers serve critical roles within your village, facilitating various tasks such as farming, trading, and crafting. By setting up a villager breeder, you can automate the generation of these vital characters, making your Minecraft experience more enjoyable.
Here’s a comprehensive guide on how to build a villager breeder in Minecraft 1.21.
Steps to Create a Villager Breeder in Minecraft 1.21
Crafting a villager breeder in Minecraft 1.21 is straightforward. You will need to gather some materials and adhere to the steps below to develop a fully automated villager breeding system.
Materials required for constructing the villager breeder:
- Water
- Compost
- How
- 100 Glass Blocks
- Carrots
- 3 Trapdoors
- 6 Beds
- 2 Signs
- 2 Villagers
Follow these steps to build the villager breeder in Minecraft 1.21:
1) Create a Water Source
Establish a water source for the breeder (Image via Mojang Studios)Start by locating a level area and dig a pit. Once ready, fill this pit with water using a bucket; you can craft a bucket using three iron ingots on your crafting table if you don’t have one.
2) Prepare the Soil
Till four blocks around the water (Image via Mojang Studios)Using a hoe, till the land around the waterhole, ensuring to cover four blocks in each direction. This creates the necessary environment for the villager breeding process.
3) Form a Farming Area
Continue to till the remaining blocks to connect them, forming a large square area. This space will serve both as the breeding ground and food source for the villagers.
4) Sow Carrots
Plant carrots in the tilled area (Image via Mojang Studios)Now, you need to plant carrots in all the tilled spaces to maximize food production, which is crucial for breeding villagers.
5) Position the Composter
Place the composter above the water source (Image via Mojang Studios)Next, place a composter directly above the water block in the center of your setup and then stack a glass block on top of it.
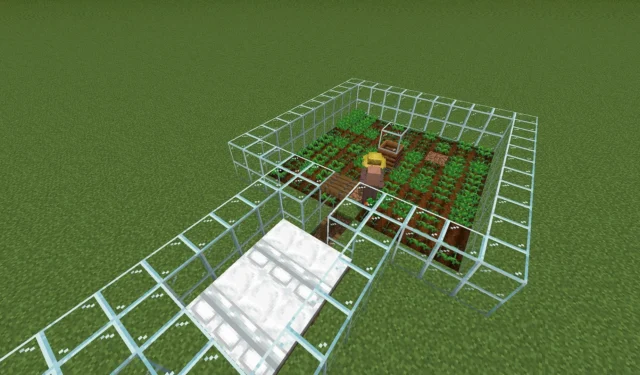
6) Build a Glass Barrier
Construct a double glass barrier for protection (Image via Mojang Studios)Encase the entire farming area with a glass wall that stands two blocks high. This prevents unwanted mobs from entering and harming your villagers.
7) Create an Access Point
Establish a pathway to the catchment area (Image via Mojang Studios)Next, select one side and break two glass blocks in line with the composter to facilitate movement for the gathered villagers.
8) Install Trapdoors
Place three trapdoors as highlighted in your setup. This mechanism will assist in collecting new villagers efficiently. Keep the last trapdoor closed to prevent adult villagers from escaping.
9) Set Up Beds
Arrange six beds for villager spawning (Image via Mojang Studios)Arrange six beds around the trapdoor area, ensuring the first bed is directly in front of the trapdoors.
10) Dig a Collection Area
Dig three blocks deep directly behind the beds. Clear all blocks straight ahead until you reach the trapdoors.
11) Add Water to the Collection Area
Fill the pit with water to trap the villagers (Image via Mojang Studios)Fill this dug-out area with water using your bucket. The current will direct any villagers downwards.
12) Install Signs
Place signs to stop water from flowing back (Image via Mojang Studios)Place two signs strategically to effectively halt the water flow, keeping baby villagers from returning back to the breeder.
13) Clear Upper Blocks
Clear the upper blocks to access the collected villagers (Image via Mojang Studios)Next, remove the blocks above and in front to create an opening for the collection area.
14) Enhance the Water Stream
Create a stream to guide the collected villagers (Image via Mojang Studios)Pour water to create two streams, one leading into the shaft and the other extending forward.
15) Extend the Water Flow
Form a slope by breaking blocks to allow water to flow (Image via Mojang Studios)Keep breaking blocks in the direction of the water flow to create a gentle slope until the water stops.
16) Enclose the Entire Setup
Fully encase the villager breeder to prevent threats (Image via Mojang Studios)Once the water stream is set, encase the beds and streams with two stacks of glass blocks to ensure complete protection from any hostile mobs.
17) Replace the Tilled Block
Substitute the tilled block in front of the trapdoor (Image via Mojang Studios)Replace the tilled block in front of the trapdoor with a grass block or another type of block to guide baby villagers toward the trapdoor.
18) Introduce Villagers
Bring in two villagers to activate breeding (Image via Mojang Studios)Release two villagers into the breeding area. They will be responsible for producing new villagers. You may temporarily remove some glass blocks to let them in, then seal off the area.
19) Initiate the Farming Process
Feed villagers to set the breeding process in motion (Image via Mojang Studios)To commence breeding, deliver a few stacks of carrots to your villagers. This self-sustaining villager breeder will allow them to cultivate more food over time after that initial input.
20) Await the Breeding Process
Take a step back and watch the villagers breed (Image via Mojang Studios)Watch for hearts to appear around the villagers, signifying that they are in breeding mode. It’s best to keep your distance during this time to avoid disrupting the process, and wait for the baby villager to emerge.
21) Your Villager Breeder is Operational
Observe as the baby villager moves towards the collection area (Image via Mojang Studios)Once a baby villager is born, it will navigate down the trapdoor and flow along the water stream to the designated collection area, ultimately maturing into an adult. Your villager breeder in Minecraft 1.21 is now functioning effectively.
Utilize your villager breeder for maximized efficiency in your world (Image via Mojang Studios)You can periodically check in to feed the baby villagers, accelerating their growth, or simply allow the natural process to take its course. Ensure to manage your population by relocating older villagers. Consider installing a dispenser with minecarts to systematize their transportation out of the breeding area.
Explore more Minecraft content:
Source
Related Articles:
Upcoming Minecraft Update Enhances Copper Utility with New Tools, Weapons, Armor, and Golem
20:15July 1, 2025Minecraft’s Major Graphics Update is Now Live
9:05June 18, 2025Minecraft ‘Chase the Skies’ Update and Exciting Graphics Overhaul Arrives Next Week
1:21June 13, 2025Microsoft’s Historic Windows 95 and Minecraft Alpha Themes Get Iconic Recognition
6:29April 10, 2025“Internet Reacts to Viral Photos of French Montana with the Princess of Dubai: A Diddy Distant Memory”
Top 5 Kaitlin Olson Movies and TV Shows to Enjoy After ‘High Potential’
Leave a Reply Cancel reply
Your email address will not be published. Required fields are marked *