Clair Obscur Expedition 33: Top 10 Pictographs for Parrying Beginners
In the realm of turn-based RPGs, innovative game mechanics often emerge, introduced to captivate both seasoned veterans and newcomers. The latest addition, Clair Obscur: Expedition 33, has adopted a unique parry system reminiscent of titles like Sekiro. This feature rewards keen players who can master its intricacies—but for some, the learning curve can be steep.
Alongside parrying, Clair Obscur offers a more accessible dodge command. While it requires less precision, it still necessitates some skill—a challenge for many traditional RPG enthusiasts. So, if finding the rhythm for parrying eludes you, fear not! Let’s explore the top Pictos in Clair Obscur: Expedition 33 that can bolster your performance. And if all else fails, the option to switch to Story Mode is entirely valid!
10 Dodger
The Workaround Option
If you find parrying challenging, dodging might be an uphill battle as well. However, attempting to dodge is always worthwhile—even if it feels like button-mashing! The first Picto you acquire, the Dodger, enhances your dodging capabilities. It provides +1 AP for each Perfect Dodge, which can significantly aid during encounters.
The Perfect Dodge requires similar timing to a parry but induces less stress. Sometimes, a well-timed dodge can yield unexpected bonuses. Plus, with a mere cost of 1 Lumina, it’s an affordable investment!
9 Confident
When You’re Not Confident
You might think that equipping the Confident Picto when you’re feeling unsure seems counterproductive, especially when you fear taking damage. However, this choice can be surprisingly effective. Depending on your character build, the power of this Picto may be substantial enough to reduce or eliminate the need for healing entirely.
For example, I developed a Lune build focusing entirely on enhancing vitality and defense. With this setup, Lune could absorb hits and sustain the party’s health without faltering, even while relying on support skills.
8 Greater Powerless
Trying A Different Perspective
The Greater Powerless Picto offers a tactical edge, though its application is somewhat niche. If you favor avoiding defensive Quick Time Events (QTEs), this option can be particularly valuable. It amplifies the damage reduction from the Powerless debuff by an additional 15%, stacking with its baseline 20% reduction.
By reducing enemy damage output by a total of 35%, this Picto presents an excellent defensive strategy—albeit with the caveat that only Monoco has skills that can apply the Powerless debuff. Alternatively, consider equipping the appropriate Picto that inflicts Powerless on basic attacks if Monoco is unavailable.
7 Enfeebling Mark
Make Them Even More Powerless
One of the standout features of Expedition 33 is its customization potential. Players can create formidable builds that capitalize on stacking effects. Pairing the Greater Powerless Picto with an Enfeebling Mark Picto results in marked enemies dealing 30% less damage.
The Mark debuff is essential to apply consistently due to its significant impact on damage reduction. Combining these debuffs will leave enemies helpless, making parries unnecessary as their attacks become barely noticeable.
6 Greater Shell
Raise Thy Defenses
While debuffing enemies is critical, fortifying your allies through elements like the Shell can effectively reduce incoming damage by 20%.When enhanced with the Greater Shell, damage reduction increases to 30%.
While the specifics of damage reduction stacking in Expedition 33 remain somewhat obscure, leveraging all available Luminas with Shell and applying Powerless to enemies creates a formidable defense. Various characters, such as Maelle and Sciel, can activate Shell, allowing for significant synergy with other abilities.
5 Base Shield
Shield Is Your Best Friend
The Base Shield Picto is a versatile choice, offering significant benefits, particularly for players struggling with parrying. Its provision of one guaranteed shield each turn allows you to absorb a hit you may have otherwise missed.
This shielding strategy comes in handy against numerous enemies, especially those with powerful single-hit AOEs. With all party members equipped with Base Shield, survival becomes feasible, even during hectic combative moments.
More Shields, Please
If the Base Shield proves too inadequate against relentless enemy strikes, consider the Solidifying Picto. It has repeatedly saved me from disastrous combat scenarios, providing a buffer against unexpected damage from missed parries.
This defensive mechanism activates once, providing relief when necessary, safeguarding you from instant defeat due to timing errors.
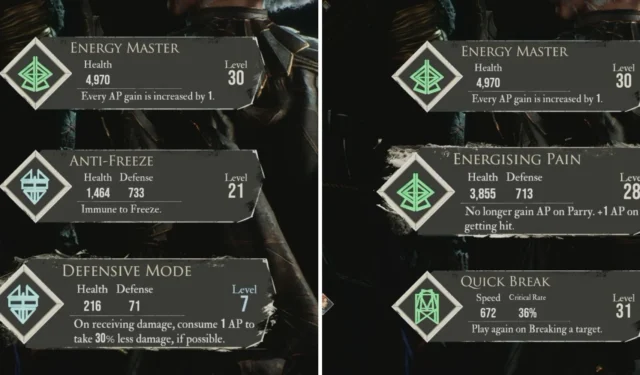
3 Energising Pain
What Doesn’t Kill You Makes You Stronger
For players who have given up hope on mastering parries, the Energising Pain Picto serves as a lifeline. This feature revolves around rewarding players with AP not for successful parries but simply for getting hit.
This effectively allows for a “try and fail” approach to parrying, as you earn points for every attempt, whether successful or not. Additionally, it bolsters Health and Defense, granting the resilience necessary to endure enemy onslaughts.
2 Defensive Mode
Defense To The Max
Prepare yourself for a surprising revelation! I tested the Defensive Mode Picto extensively and discovered that it possesses unique mechanics that might not be functioning as anticipated. This Picto reduces damage taken by 30% at the cost of 1 AP, activating under appropriate conditions.
Curiously, when paired with Energising Pain, both effects trigger simultaneously—with no depletion of AP. This synergy can be incredibly powerful, allowing you to absorb hits and reap benefits from every blow without compromising your AP reserves.
1 Second Chance
The Power To Suck Once Again
Second Chance is an invaluable Picto that every character should possess in their arsenal, regardless of their build. This feature allows a character to revive with full health upon defeat, once per battle, offering a critical second chance during high-stakes encounters.
This mechanic effectively gives you license to make mistakes throughout the battle, particularly when experimenting with the parrying system. The Grosse Tête fight offers a perfect environment for practice.
The only drawback is the high cost of 40 Lumina to equip it—but in light of its incredible utility, this investment is more than justified.
Source & Images
Related Articles:
Top 10 Survival Games Featuring Soulslike Mechanics
14:03July 13, 2025Top 10 Metroidvania Games to Convert You into a Fan
13:05July 13, 2025Comprehensive Reggie Guide: Master the Art of Dating Everything
18:44July 12, 2025Top 10 Iconic Boss Fights From the PS1 Era
15:03July 12, 2025Clair Obscur Expedition 33 Guide: Strategies to Defeat Chromatic Abbest
Khazan Endings Guide: Discovering the First Berserker
Leave a Reply Cancel reply
Your email address will not be published. Required fields are marked *