After you've done the tutorial part of Paper Trail that shows you the basics of paper-folding, you'll come to your first proper level - The Cave. This is the sequence after sneaking out at night, and you'll know you've reached it when you meet the origami deer for the first time.
RelatedPaper Trail Interview - Henry Hoffman On Folding Paper Into Video Games
We spoke with Henry Hoffman of Newfangled Games about his upcoming puzzle game Paper Trail.
PostsEach level in Paper Trail requires you to fold different pieces of paper to navigate through to the next level, as well as containing optional origami collectibles that you can collect by veering off the main pathway a bit. Here, we'll cover how to get through the level and snag all those collectables, so you can 100 percent the level.
How To Enter The Cave
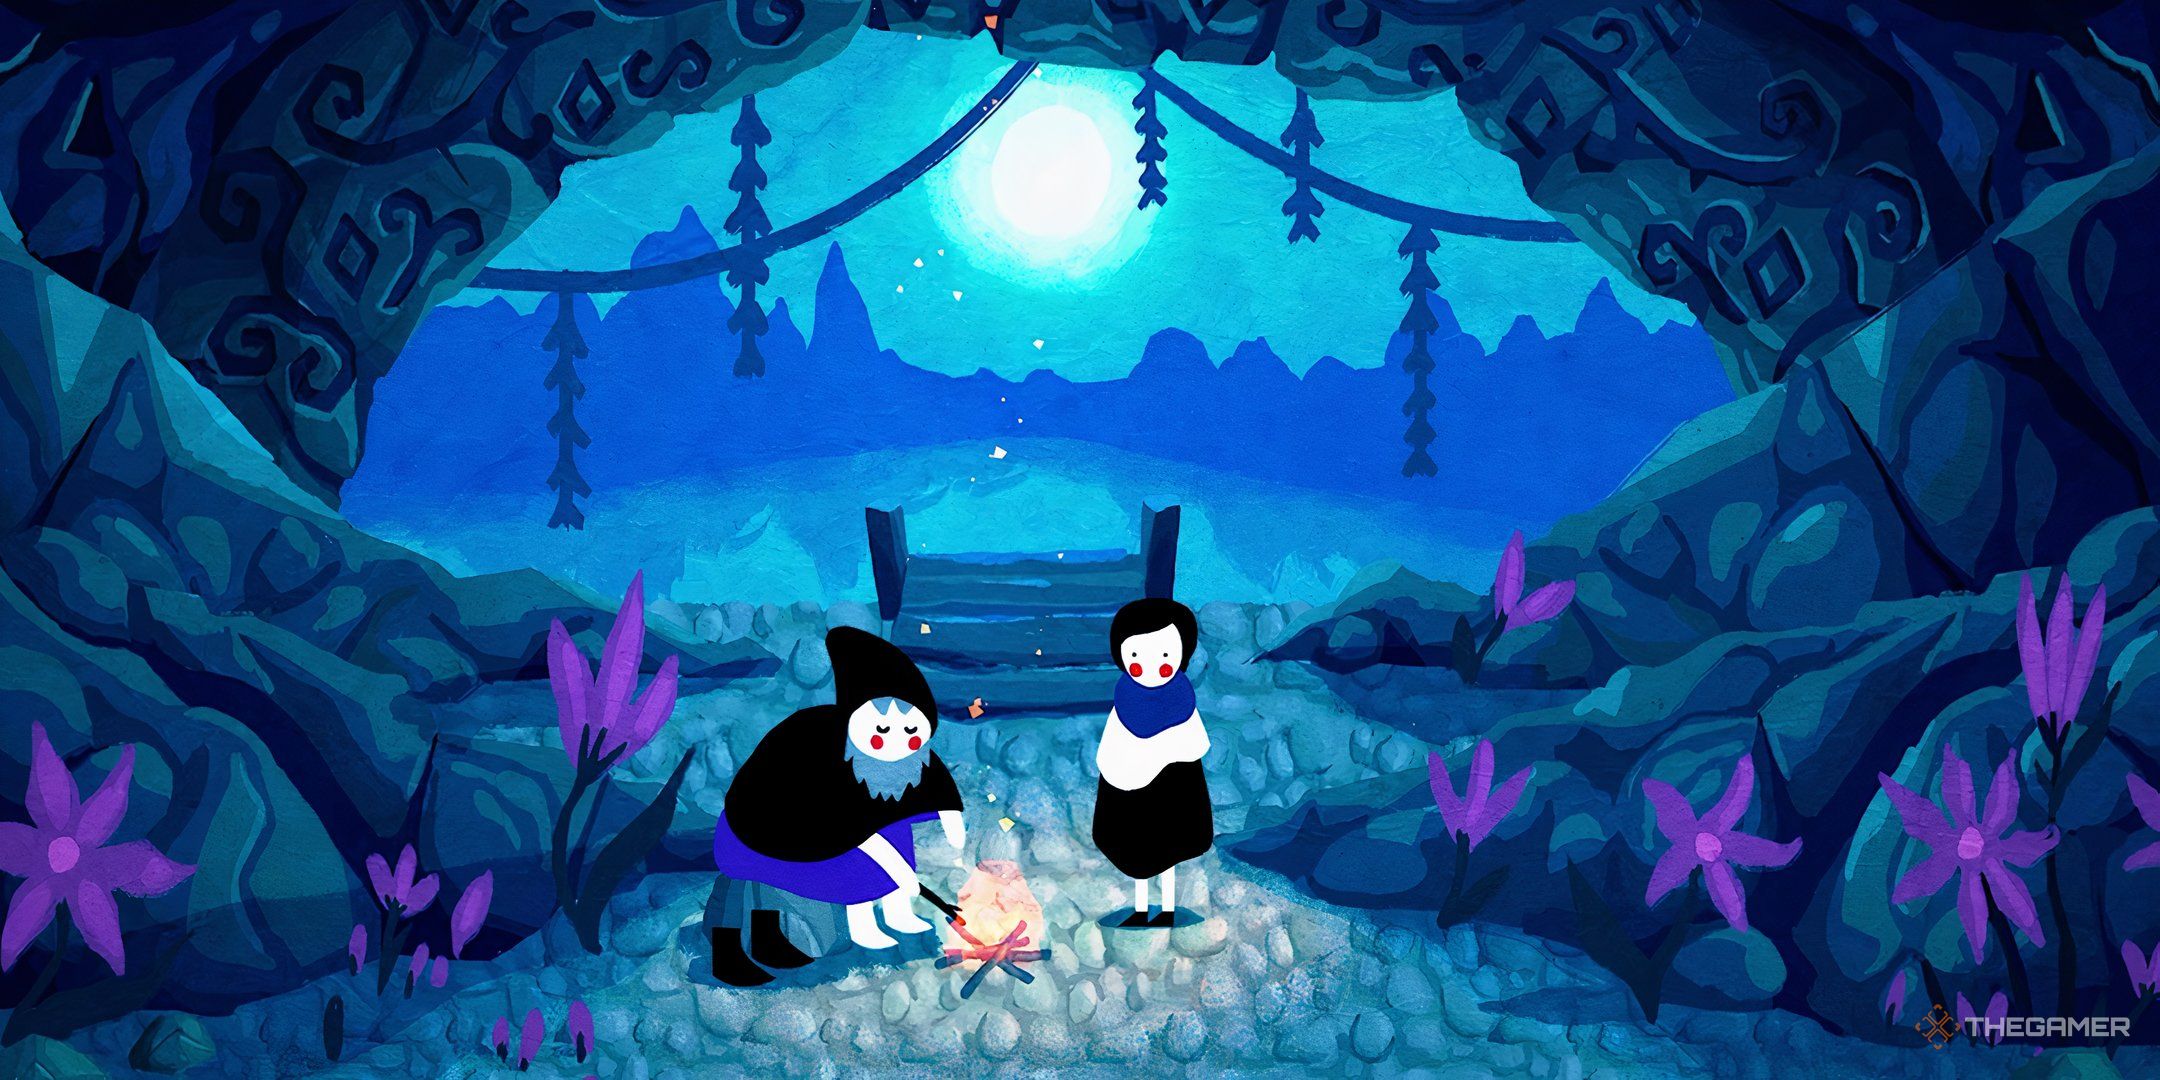
CloseAs you head north from Paige's home, you'll find the origami deer in front of a blocked caved opening. Your clue for how to continue is the archways on the ground.
- Fold the bottom of the paper up in a straight line, making the archways on the folded part line up with the arched patterns in front of the cave entrance.
- Fold the top right corner down to match the additional arches.
- Fold the top left corner down to match the final arches.
- The cave entrance now opens, so head on in.
Page One Walkthrough
CloseOn the next screen, you'll be introduced to the numbered tiles. Essentially, these must be matched with another of the same number to walk over them, at which point they'll glow so you'll know you've done it right.
Fold the top left corner down so that the tile with two dots matches the other tile with two dots to progress to the second page.
Page Two Walkthrough
Close- On the next page, fold the top down in a straight line so that both the one-dot and two-dot tiles are matched with another of the same type.
- Walk across to the right with Paige, then flatten the page again (unfold it).
- Fold the left side of the page in a straight line over to the middle until the two-dot and three-dot tiles match their pairs.
- Walk to the top of the page with Paige, but not too far to the left as you'll need to unfold the page flat again once she's at the top.
- Fold the bottom of the page upwards enough so that the four-dot and two-dot tiles are matched with their pairs.
- Walk Paige across the path until she reaches the left-most two-dot tile and then unfold the page again.
- Fold the bottom right corner upwards so that the two-dot and five-dot tiles match their pairs.
- Use the newly formed path to take Paige to the next piece of paper.
Page Three Walkthrough
CloseThis is the first time there's an origami collectable! You can press the button to view the other side of the paper at any time, revealing any hidden collectables.
We'll cover how to get it, don't worry!
- Fold the top right corner down so that the path going upwards is now three squares long, with the four-dot square to the left.
- Fold the bottom left corner up so that the four-dot square matches the other, and create a path across.
At this point, you can make it to the next page, but if you want to grab the origami collectable, hold up a minute!
How To Get The Moth Origami
Close- From the previous positions, unfold the top right corner so only the bottom left corner is still folded in.
- Fold the bottom right corner upwards so the paper is pointed at the bottom and creating a path across.
- Walk Paige to the top right of the page and unfold the paper completely
- Fold the left side of the paper to the right in a straight line, creating a path for Paige to get to the moth origami.
- Reverse the steps above to get back to where you need to be: Unfold the paper, create the point with both bottom corners pointed upwards and walk across to the left to the next page.
Page Four Walkthrough
CloseYou'll notice there's another origami up for grabs here! Here's what you need to do:
- Push the boulder as far north as it will go.
- Fold the bottom of the paper up in a straight line.
- Drag the boulder down onto the folded part of the paper and then walk around and head north.
Again, you can progress to the next page now if you want, but if you want to grab that origami then stay on this page.
How To Get The Deer Origami
Close- Pull the boulder upwards (from above) so that it goes back onto the unfolded part of the paper.
- Flatten the paper again.
- Fold the bottom right corner up until a path connects the origami to the main pathway.
- Grab your prize and then head north to the next page.
Page Five Walkthrough
Close- Fold the top right corner down so that the four-dot tile matches with another.
- Use this extra space to pull the boulder down, get to the right of it, and push it across to the left.
- Flatten/unfold the paper and walk Paige to the left of the northernmost boulder.
- Fold the left side of the paper straight across as far as it will go with Paige where she is standing.
- Fold the bottom right corner up to create a square path.
- Walk south of the boulder and pull it down so that you've cleared a path to the next page.
Page Six Walkthrough
CloseThis next page introduces the button mechanic. You need to weight the button down to remove the blockage in the path, and that's where the boulder on the right will come in.
- Walk Paige to the top of the paper, then fold the bottom of the paper up in a straight line until there a path connects the main part of this paper to the boulder.
- Fold the top left corner down until it meets the boulder, creating a square path.
- Go to the north of the boulder and push it down.
- Walk around the boulder and pull it from the left towards the left of the paper.
- Flatten/unfold the paper and then push the boulder north in line with the button, then drag it from the left onto the button.
- Head north onto the next page.
Page Seven Walkthrough
ClosePage seven presents a familiar puzzle with the origami deer. It's time to match those arches up again!
- Fold down the top left corner to match the arches.
- Fold down the top right corner to match, too.
- Fold up the bottom left corner to match more arches.
- Move Paige onto the square beside the broken bridge. This will enable you to fold the final bottom right corner up to form a complete circle.
- Now the bridge is fixed, and you can fold the bottom left corner back down to move to the next page.
Paige Eight Walkthrough
Close- Fold the left side of the paper straight over so that the two-dot tile matches with another two-dot tile.
- Push the boulder to the left of the paper.
- Fold the right side of the paper straight over so that the three-dot tile matches with another three-dot tile.
- Push the boulder to the right side of the paper and unfold the fold on the left so you can see the button again.
- Pull the boulder down and to the left to position it on the button to open the path forward.
Page Nine Walkthrough
CloseThis next page introduces the concept of keys and locked doors. You have to get to the key before you can unlock the relevant door.
- Fold the bottom right corner up so that the one-dot tile matches with its pair.
- This creates a path so you can walk and get the key, then walk Paige to the bottom of the page.
- Flatten the paper again, then fold the top left corner down so the one-dot tile matches with its pair.
- This creates a clear path through to the door.
Page 10 And 11 Walkthrough
CloseThese next two pages are interlinked as the key is on one and the locked door on another. The paper with the key also has an origami collectable.
- Fold the bottom right corner up until the one-dot tile is matched to its pair and walk across.
- Fold the bottom left corner up so the two-dot tile is matched to its pair, creating a path to the tenth piece of paper that holds the key.
- On the page with the key, fold the left side in until the one-dot tile matches with its pair.
- Move Paige to the left, then fold the right side of the paper in until the two-dot tile matches with its pair.
Now you can grab the key! You can head back to the other page at this point, but if you want to snag that origami, here's what you need to do.
How To Get The Bat Origami
Close- Flatten the paper/unfold it.
- Fold the top of the paper down in a straight line until the two-dot tile matches its pair, allowing you to walk over and grab the origami.
- Unfold the paper again.
- Fold both the left and right sides of the paper in once more to create a path back to the top, then unfold the right side to return to the last page.
Whether you chose to skip the Bat Origami or grab it, here are the next steps to unlock the path forward.
Close- Make sure the paper is unfolded/flat.
- Fold the bottom right corner up so that the one-dot square is under the right of the key platform, so there should be a square, a gap, then the one-dot tile.
- Fold the top left corner down so the two one-dot tiles pair up and create a path to the locked door.
Page 12, 13, And 14 Walkthrough
CloseThese next three pages are all interlinked as well with a key on one, a lock on another, and passage through all three to reach the next section. There's also an origami hidden on the leftmost page here.
- Fold the top right corner down on the middle page to join the one-dot tile to its pair, creating a path to the key.
- Grab the key then take Paige to the top right square on this page.
You can continue back onto the last page and progress through the rest of the level, but if you want to grab the origami collectable, here's what you need to do.
How To Get The Mouse Origami
Close- Fold the left side of this page towards Paige so that the five-dot tile is positioned to the left of a single line of the main path.
- Fold the bottom right corner up so the five-dot tile matches its pair.
- Head over and grab the origami and then return to the previous piece of paper.
Whether you snagged the origami or not, once you're back on the center page you can head over and unlock the door.
Close- Once through the door, you should fold the top right corner down down of the right-most page so that the two-dot tile matches with its pair.
- Ensure the middle page is unfolded and you should have a clear path through to the top and onto the next page.
Page 15-19 Walkthrough
CloseYou've got five pieces of paper to deal with here, with a key and lock as well as two buttons that need boulders to sort. There's also the final origami hidden here too.
- Fold the top right corner of the center page inwards until the one-dot tile matches with its pair, then take Paige to the top of this piece of paper.
- Unfold the paper, then fold the bottom right corner inwards on the same page to create a path to the key.
- Head down and grab the key.
- Step back on the page in the center, then on the bottom left page, fold the bottom left corner upwards until the four-dot tile matches the other.
- Go over your newly created path to the boulder, go to the left of it and push it right.
- Next, go above the boulder and push it down as far as it will go.
- Go to the right of the boulder and push it as far right onto the next page as you can go and onto the button.
- The bottom right corner on the center piece of paper should still be folded up to create a pathway back to the top. If not, fold it this way again to take Paige to the top of the paper.
- Unfold/flatten the paper and then fold the bottom of the center page up until there is a path from below the blocked door leading to the symbol tile on the right.
- Follow this new path to the locked door, which you can now unlock.
- Fold the bottom right corner of the bottom right piece of paper upwards so it's perfectly in half.
- Go to the top right page and grab the boulder, then drag it left as far as you can.
- Ensure the center page is unfolded/flat.
- Fold the top right corner of the top right piece of paper so that you create a point on the right side. You now have a path to push the boulder through.
- Push the boulder to the right, then go north of it and push it down as far as it will go. Next, go to the left of it and drag it onto the button.
- Walk back through the path you took the boulder on to get back to the top of the center piece of paper.
- Fold the bottom of the center piece of paper to create the path around the rock again, and then head on through the open door.
The door is now open and you can progress through, but let's not forget that origami!
How To Get The Rat Origami
Close- Take Paige to the left of the main piece of paper, at the top.
- Fold down the top left corner of the top left piece of paper and walk onto this newly folded leftmost piece of paper.
- Fold the right side of the main center piece of paper straight over as far as it will go.
- Fold the bottom of the bottom right piece of paper straight up so that the one-dot tile matches the other one-dot.
- Now you can walk right over and grab the origami.
Collecting this final origami in the Cave level will unlock the 'Rocks, Paper, Scissors' achievement/trophy.
Afterwards, head back to the top left page, flatten the center piece of paper, and head out of the exit to the north to complete the Cave.
You'll unlock the 'Journey to the Centerfold' achievement/trophy for completing the Cave level.
NextPaper Trail Review - Smudge Free
Paper Trail seeing you take Paige on a journey, one beautiful page at a time.
Posts